Hello My Friends, Colleagues, and Peers out there in blog land,
It is with deep sadness that I have to inform you that this is my final post on this blog. Due to restructuring and budget cuts by my board, my position as Math Coach has been "discontinued." I will be returning to the classroom in the fall.
The past 3 years (and the past 5 as a Math Coach) have made me learn so much - and not just about math but about classroom management, higher order thinking, policies and procedures, the way students of all abilities learn and the way that schools run. I've loved sharing all of the hard work that "my" teachers have done with all of you, and hope that you can see their dedication and committment to their students through their work.
On a personal note, I am going to be scratching an item off my "Bucket List" this fall and could use your support. I'm completing a half marathon for the Leukemia and Lymphoma Society of Canada. Blood cancer is something that has touched my life in many different ways, and running a half marathon in the US is on my "bucket list" so I decided to put the two things together and put my running to good use and help out that charity.
You can help support me by making a secure online donation using your credit card. Click on the link below:
http://my.e2rm.com/personalPage.aspx?SID=3385391&langPref=en-CA
You will receive an email confirmation, along with your tax receipt for your donation and I will be notified as soon as you make your donation. I thank you in advance for your support, and really appreciate your generosity!!
Thank you for all of your e-mails, and views.
I hope that you make this upcoming school year the year you "Pick math, choose math, love math"
Lesley :)
Friday, June 29, 2012
Planning Around Us
I had the pleasure of doing some planning with the Primary Division at Wexford the other day, and since they have solid long range plans in math, we decided to focus on what some of the struggles they had teaching math.
We decided to use the Freyer Model to help us organize our thoughts around what the one thing was that we struggled with in math. We placed that in the centre of the organizer. Then we gave an example of what it looked like in our classroom, and what the "ideal" situation would look like. The last section was for us to create "solutions" to our struggles. Here are what our finished products looked like:


The best part of the activity was the rich discussion we had as a group talking about solutions to our struggles. In our discussion we were able to offer support and advice to each other; provide examples of successful strategies; clear up misconceptions that we had about math; and really get a chance to learn from each other as we work towards student success.
Thursday, June 7, 2012
Planning Just Got Easier
Last night almost 30 committed and excited teachers got together to create a binder full of great problems to use in their classroom for the upcoming school year. The workshop was called: 2 problems x 5 strands = 10 great problem based lessons to use in your classroom.
Each teacher got a cover page, index tabs, and 10 problems organized by Overall Expectation. The problems were all new to us as they were taken from back issues of Teaching Children Mathematics, the publication from the National Council of Teachers of Mathematics (NCTM). You can find out more about them, or sign up for a membership at www.nctm.org
Here is what the cover of our binder looked like:

The attendees worked through several problems talking about how they would modify the program to meet the needs of their grade, what the learning goals would be, how they would assess this problem (based on the achievement chart) and what modifications and accommodations they would make to fit the needs of students in their class.


I know I really learned a lot from working with everyone and can't wait to try some of these problems out with students.
Probability in Pictures
My Literacy Coach and I took a few teachers to visit a demonstration classroom recently, and although we were there to see Rakel's literacy program I couldn't help but take a peek at the math in her room as well.
Her Grade 1 class is working on probability. As we know, it's pretty simple in Grade 1 and the focus is more on the understanding of the likelihood of events occuring. Because her language program is so rich, it allows for her students to be more successful in their written communication in math class.
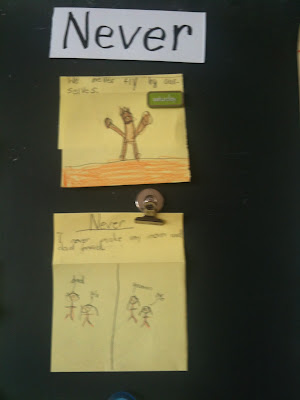
Here is her anchor chart as the centre of the work that they are doing around probability. She has a definition of probability, and then you can see her minds-on activity under that. She asked the students what would happen they tossed a coin in the air.


This is a great activity for students to do to help them understand a little bit more about probability. Thank you for opening up your classroom to us Rakel!
Her Grade 1 class is working on probability. As we know, it's pretty simple in Grade 1 and the focus is more on the understanding of the likelihood of events occuring. Because her language program is so rich, it allows for her students to be more successful in their written communication in math class.
Here is her anchor chart as the centre of the work that they are doing around probability. She has a definition of probability, and then you can see her minds-on activity under that. She asked the students what would happen they tossed a coin in the air.

For the action, the students set to work showing examples of events that Always Happen, Sometimes Happen and Never Happen. It is organized nicely by using magnetic clips to hold up the students work.


This is a great activity for students to do to help them understand a little bit more about probability. Thank you for opening up your classroom to us Rakel!
Thursday, May 10, 2012
Combined Grade Easy!
Andrea teaches a combined 4/5 class. She is really lucky because her team was able to work their LOI position to help break the combined grade down into single grade periods for part of the day. Each day Andrea gets to have 1 period with just the grade 4s and 1 period with just the grade 5s (They go off to Science/social studies during that period). This has helped her to meet the needs of her class because she is able to teach math to them in both a combined grade and single grade setting.
Her class is currently studying multiplication and division. For this lesson, the students would only be focusing on multiplication. Andrea wanted to do a lesson where the students would have the opportunity to not only practice this skill, but also see that there are different strategies that they can use to help them solve these types of questions. She decided to do her lesson as Bansho to help the students see all of the different strategies that the class was able to come up with. Her lesson started with the whole class, then it was just the Grade 4s and then it was just the Grade 5s.
She started her lesson with the whole group by highlighting the learning goals and success criteria:


Once the students were done, they had a class discussion as to what strategy they would try next time and why. It was interesting to hear from them what their "a-ha" moments were and what they took from seeing the strategies. Here is what the lesson looked like as a Bansho when it was fully completed:

Another great example of how to multiply in more than just one way.
Her class is currently studying multiplication and division. For this lesson, the students would only be focusing on multiplication. Andrea wanted to do a lesson where the students would have the opportunity to not only practice this skill, but also see that there are different strategies that they can use to help them solve these types of questions. She decided to do her lesson as Bansho to help the students see all of the different strategies that the class was able to come up with. Her lesson started with the whole class, then it was just the Grade 4s and then it was just the Grade 5s.
She started her lesson with the whole group by highlighting the learning goals and success criteria:

The students then did a math string to help draw out the strategies that they were currently using. They were asked to mentally solve the problem first, and then do a turn and talk with their partner. To help slip in some accountable talk, they they had to share what their partner's strategy was for solving the problem.

You can see how some students did multiplication by skip counting, or by using known facts to help them break the problem into smaller chunks. Others used the "traditional" way of multiplying. She even introduced them to the area model to show them a different perspective.
When the Grade 5 students left, the Grade 4s were given their problem and solved it. What was interesting was that in terms of strategies, the Grade 4 students had many more strategies to draw upon that the Grade 5 students. As a class they found this kind of interesting.
Here are the problems that they completed:

Here is what their different strategies were. These pictures are of the whole group, not just the Grade 4 or Grade 5 work. The strategies are broken out into very distinct groups. There could have been a few that were grouped together, but Andrea wanted to stress to the group that there are multiple ways of getting an answer, and that all of them are correct - but we can all learn a new strategy in the process.


Once the students were done, they had a class discussion as to what strategy they would try next time and why. It was interesting to hear from them what their "a-ha" moments were and what they took from seeing the strategies. Here is what the lesson looked like as a Bansho when it was fully completed:

Another great example of how to multiply in more than just one way.
Friday, April 20, 2012
Chocolate Does Wonders For Grade 1/2 Students
Lisa teaches a combined Grade 1/2 class. Her students have been working on measurement. Lisa wanted to do an activity with them that would not only be meeting curriculum expectations, but also be interesting to them. Chocolate came to mind (who doesn't like chocolate!) and a great lesson was born from there.
For her minds-on the students had to decide what pencil to get rid of. She scribed their thinking as they discussed what their answer would be. Notice how she has the success criteria (in very friendly Grade 1 language) at the bottom of the page. A great way to keep it handy and make it be able to refer to it quickly and easily.

For the action is where the chocolate came in. She gave them this problem:
 The students were shown two different chocolate bars. Lisa had made a ruler using linking cubes (which she alternated into two different colours to make the counting easier) and then the students used the ruler to help them measure the two bars. Because there were only two chocolates, Lisa had taken a picture of the chocolate bars with the rulers underneath them. She then created their worksheet with this picture and the question on it. This allowed the students to write write on the photo to help them with their strategies.
To consolidate, Lisa chose a few students to come up and share their work. She then had the class give oral feedback as to what they did that was really good, and what they could do better. The students were really positive with each other, and listened to feedback that was given and used similar feedback with the next person.


For her minds-on the students had to decide what pencil to get rid of. She scribed their thinking as they discussed what their answer would be. Notice how she has the success criteria (in very friendly Grade 1 language) at the bottom of the page. A great way to keep it handy and make it be able to refer to it quickly and easily.

For the action is where the chocolate came in. She gave them this problem:

To consolidate, Lisa chose a few students to come up and share their work. She then had the class give oral feedback as to what they did that was really good, and what they could do better. The students were really positive with each other, and listened to feedback that was given and used similar feedback with the next person.


The Answer Isn't Always Right....But I Can See Where You Went Wrong
As an intermediate teacher Antonia struggles at times to get her students to show all of their thinking. No matter how many times she explains to them that the correct answer is only a small part of the mark they still don't show all of their steps. For this lesson she decided to do it as a bansho and focus in a bit more on having the students give descriptive feedback to each other to help them improve upon their work. In this problem it became clear pretty quickly that although the students were doing a good job of showing their work, they missed out on one important piece in the question and then got the final answer wrong. But - because they showed their work, Antonia was able to see where they went wrong and help them not make the same mistake again, and their mark wouldn't suffer too much.
To start off her lesson, the class reviewed the learning goals and success criteria for this strand:

They then did a minds-on activity based on their upcoming trip to overnight camp:

The action involved them deciding what bus company they should choose to make the trip. She offered them three choices, all with different components to think about. What was important to remember was that the bus needed to go up to Wahanowin and back - the trip is about 250km each way. This was what most of the students forgot to do when they solved the problem.

For the consolidation, two groups volunteered to share their work with the class. As a group, the class gave some descriptive feedback based on the success criteria that was co-created earlier. The feedback was recorded on our bansho and then the rest of the class set off to give feedback (on post-it notes) to one other group.

When they were done, the students then went back (and in another colour / pen) and made changes to their work based on the feedback they were given. Here are two examples of what the "edited" work looked like.


Subscribe to:
Posts (Atom)