Wednesday, February 29, 2012

Bansho Within A Bansho

For Lisa's lesson study she wanted to not only do a Bansho as a consolidation strategy, but also do her lesson as Bansho.  She teaches a combined Grade 2/3 class and wanted to do a parallel task that would allow for both grades to not only meet curriculum expectations but also do some problem solving as well.  So she took a question from a previous EQAO test and modified it to meet her needs. 


Her minds on involved estimating and measuring objects in the classroom using both standard and non-standard units. 


For the action she had the Grade 2 students (and any student on a modified IEP) do a problem where the students had to figure out how tall a student was.  For the Grade 3 students they had to use a reference of a door and a door knob to determine how tall a student was.


What was a great experience for this lesson study was that we went a little longer during the action, so we didn't get to consolidate right away.  The students finished up just as the recess bell rang.  What was great for the nine teachers in the room is that it allowed us the time to talk about the strategies that the students used to solve the problems, and where we would put them in the Bansho.  This is an opportunity that we don't always get when we are working in such a large group. Usually, the two or three people co-teaching get to have this discussion, but it is usually on the fly and usually done pretty rushed.  But today, the nine of us had about 15 minutes to sort through the work, move it around, and persuade others to see our reasoning behind our choice.

When the students came back we had them talk about what they noticed was the same in each of the groups and what they noticed was different.  They then gave their strategy a name and recorded it.  Here is what they saw:

Counting cubes to get her height.

Doubled checked by counting backwards from 18 to the door handle.  (They originally counted up from 9 to 18 to see how many blocks were left)

Drew a line to meet the door knob.


Used subtraction after they converted M to Cm
Here is what the finished Bansho looked like:


A great afternoon spent with a great group of colleagues learning from each other, and working towards improved student achievement.

Measuring Length

How do Grade 1/2 students learn about non-standard units?  The answer to that is easy:  They just do it!  To help our Grade 1 PLC get some ideas and have some discussion around measurement Ranald offered up his classroom to the 9 teachers for us to use to get some ideas and brainstorm some solutions on how to tackle our measurement hurdles.

Ranald wanted to try something a little different with his class, so he decided to do his lesson as a Bansho.  When you do that, you have everything from your learning goals and success criteria right through to your highlights/summary sheet all in one spot.  Usually this is done on brown craft paper or mural paper.  Here is what his finished one looked like:


He began with putting his learning goals up for his students to see. 


Then was his Minds on activity.  In this lesson they were deciding what non-standard unit would be the best to use when measuring various classroom objects.  You can see they had to estimate first (a skill that many students struggle with) and then they did the actual measurement based on what unit they chose.

 For the action, the students were given a piece of paper and rolled a number cube to see how many cubes they would be using to measuring.  Ranald chose to do this as a way to help speed the process along to get the students measuring objects around the room.  The students then got to work moving around the classroom finding things that were about as long as their "ruler."


As a consolidation, the students then shared how long their ruler was, and then what they measured in the room that were about that long.  You can see some of the things that they measured from the classroom:


 The class also created a highlights sheet of things that they need to remember when they measure objects. 

What the group found interesting was that the highlights that were created had more to do with the minds on than the action part of the lesson.  That lead the group to a great discussion as to what we could have done different to pull more highlights from the action than the minds on.


Seeing the lesson, and another person's classroom, is just part of the experience.  Talking about the lesson and what changes we would make is a greater part of the experience.  When we talk as a group we are able to flush out other lessons, and talk about where we think the unit can go and how to move the students along. 

Thank you for a great morning Ranald!

Area of the Base...Area of the Base!

Antonia did some creative re-arranging with her teaching partner to allow for our PLC to see her Grade 7s in action for a lesson study.  She used an assessment from ONAP as a way to create a minds on and action for her students to participate in.  Here is a picture of what she gave them for the Minds on activity:


If you notice at the bottom there are two different formula written down for Volume.  The reasoning for this is because we know that in the past students struggle with finding the volume for objects because they forget that they need to find the area of the base first, and then move on from there.  As we took up the minds on, we found that the students also had another misconception:  That you can just divide by two to find out how many candies you need.  While it works in this case, Antonia wanted to make sure that her students understood why it worked - And why it may not work everytime they had to figure out how many of something went into something else.  We also talked about how the formula for finding out the volume of the candies was different than the formula for the box - Because the base was different.  (Once again...area of the base....area of the base...)  Here is what was recorded from the discussion:


For the action, the students were asked to find out what size box they would need to hold 64 candies.  They had to make two boxes (one a rectangular prism and one a triangular prism) and decide which one they thought the candy company should go with and why.  Due to time constraints we did not get to have a consolidation with this group.  However, the teachers that were at the lesson study had some really rich conversations on what we noticed the students were doing well with, and what they were struggling with.  We looked at the student work and talked about what we noticed and what we would do differently in our classrooms with our own classes.

Here are some samples of student work:

This group was very thorough in their answer.

A close up of the math.

You can see they broke their thinking into parts to help them attack the problem.

A close up of some of the writing.

This group started with the notion that they needed to find what half of 64 was.

Trial and Error helped this group decide what the volume of the box needed to be.

Monday, February 27, 2012

Room With An (Almost) 360 View

As our final FOS PLC have been taking us into classrooms, one thing I hear over and over again is how much people like to see how others not only have their classroom arranged, but also what they have up on the walls.  Many ideas are being "Educationally shoplifted" and taken back to classrooms all over our FOS. 

Michael has the challenge of teaching a combined Grade 6 /7.  As any teacher will say, a combined grade that spans two divisions is challenging.  But Michael is making it work.  Here is an (almost) 360 view of his classroom.  I say (almost) 360 because he does have one full wall of windows, so there is nothing posted on top of the windows.  Here is what his classroom looks like:

On his front boards, he has all of his Minds On and Action activities written out.  He also writes out his consolidation activities as well.

Samples of student work and highlights sheets are also hung up at the front for everyone to see.

Some language charts...It can't all be math :)

Learning Goals for two grades can be tricky.  Here is how Michael used some small space to make them clear and easy for the students to see.  The check marks are what the students have already worked on.

A closer view of the learning goals.

Helpful anchor charts are hung in the classroom.

The back bulletin board has some helpful things to remember about their Geometry unit.
Get out and see each others' classrooms!  If you need any help finding someone who teaches the same grade as you let me know.  I can help to arrange a visit either on a JELI or JAM day or after school.

Graffiti Minds On

Michael invited his PLC into his classroom today so we could be part of a lesson study with him.  He had planned a lesson where the students had to divide an area of land into smaller parcels or plots.  The lesson started with a great minds on activity.  He had the students do a graffiti of what they knew about area, perimeter, 2D shapes, converting units, and measurement in general.  Each table had 1 minute to write out what they could, and then they passed it onto the next table who would add to it.  When each page got back to the original group they were given 4 stickers, and had to put the stickers on the things that were the most important to remember about each topic.  Here are the pictures of the activity:


During their action, they solved the problem in small groups.  The problem involved converting the measurements into one common unit, and also finding out the area of two different plots of land and deciding how many of the smaller plots would fit into the bigger plot of land.

The consolidation was a chance for the students to offer each other some descriptive feedback on what was done well, and what needed to be improved upon.  Each group was given another groups work, and 4 post-it notes.  They were reminded to be respectful of each others' work, and to write down 2 positive comments and 2 comments about things that they could do better.  Here are some of the work samples and the comments that were given:
This group got the right answer, but made a few calculation errors in the converting.

Clear, step by step instructions.

Diagrams and multiplication - But units are missing.

Nice clear final statement.

Calculation error in their conversion.
After the lesson we headed back to the staff room to debrief.  One of the other teachers said that she thinks she may do the graffiti as a way to see what her students know before they head into measurement.  Then add to it as they go along.  This way, she'll get to see misconceptions that they have, and also know what formula they know off the top of their heads, and what they are unclear on.  Because this is a combined Grade 6 / 7 class we also discussed making the action more of a parallel task where the numbers and units were different for the Grade 7 students.  We also talked about how the shape could be more challenging (e.g., a trapezoid or parallelogram) and how the dimensions could involve a decimal place.  This could not only make the conversions a little more tricky, but can also bring up the idea of having to round up or down to get a final measurement.  We also talked about the fact that none of the students left any space for a path to walk through.  It may have been interesting to see if they would have said 39 units and 1 unit worth of space to move around in.
A great lesson, with an even greater de-brief session.  Thank you everyone for participating in such a great professional afternoon.

Oh those trapezoids!

Sanjai's Grade 8 class is going to be starting to learn about circles and cylinders shortly, so he decided that he wanted to see what his class remembered about volume before he begun.  He opened up his doors to the members of our PLC and we got to watch him and his kids in action and learned about not only what to expect when our students do this lesson, but also what we could do as teachers to make the lesson even better for the students.

Minds on:  In pairs, the students wrote down every formula that they could remember for measurement.  They then shared them aloud and they were recorded on the board.   Sanjai had them also discuss "different" ways that they can write some of the formulae (e.g., Instead of V=lxwxh you could say: Volume is: the area of the base times height)

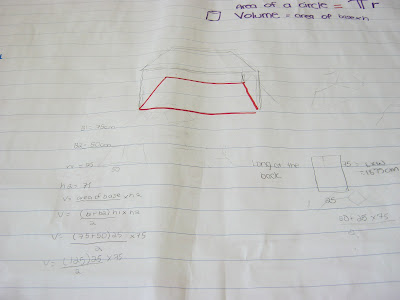
Action:  The students set to work completing a problem from the Grade 7 measurement expectations.  It is the one about finding the capacity of an aquarium that has a base that is a trapezoid.  As the students were working, the teachers were having some great discussions about what they noticed the students were struggling with, and the strategies that they chose to tackle the problem.  Many of the students struggled with having the "long end" of the trapezoid as the back of the aquarium.  Traditionally when they see or draw a trapezoid they make the shorter end at the top, and the longer end at the bottom.  This became troublesome when they had to put in the measurements of each side.  Another area that the students were struggling with was where they were going to put the height of the trapezoid.  They struggled because there really is two heights in this problem.  The height of the base and the height of the actual aquarium (needed to find the volume which would help us translate into the capacity).  Lastly, the final struggling point was using the actual formula.  Because they struggled with what "B1" "B2" and "H1" and "H2" were, they were not sure what number to put where.  John, one of the teachers participating drew us a great example of a 3D aquarium and also put down all of the parts of the formula down the side.  This was a great way to get the kids to see what went where and why.

Consolidate:  Since the students were struggling a little, Sanjai brought them back together to talk them through what they already knew about volume and what it meant.  He held up the recycling bin as a way to help the students understand what they were looking for.  He also did some other examples on the board of shapes they were more familiar with (e.g., rectangular prism) and how they would find the volume of that.  He then used the diagram that John drew and talked them through what to put where.  At this point, several cheers went out from the students as they realized they were on the right track and had gotten the right answer.  Other cheers happened because the students could now see what their misconceptions were, and now had the strategies to fix it.  One group cheered because they had the right answer, but had gotten it a different way.  They shared their strategy with the class and were quite happy.

Here are some pictures of the student work.  You can see what their thinking was as they attempted to solve this problem:

This group had to change their measurements of the B1 and B2 to make it match the measurements in the problem.

This group was starting to decompose their shape into other known shapes. 

There were a lot of formulas being tested, and diagrams being drawn.

This group was working with substituting the numbers to find the answer (in pencil on the left.  Click on the photo to enlarge)

Substituting The Variables.

This group decomposed the shape into two triangles and one rectangle.  They then added the area of the two together and multiplied to get the volume.

substitutions.
As mentioned, this lesson gave all of us participating a lot to think about.  The experience gave us a chance to not only see what struggles our students may have, but give us ideas to help steer them in the right direction.  Thank you for opening up your doors to us Sanjai.

Saturday, February 25, 2012

Algebra Fun

A few weeks ago myself and some teachers from our FOS attended the Y4MA Spring Conference on Patterning and Algebra.  Dr. Ruth Beatty was the plenary speaker.  I got to hear her and her writing / researching partner Dr. Cathy Bruce speak at Math Camppp, and I couldn't wait to hear her again.

During the plenary session, each group was given a "secret" equation and then represented it using two colour tiles.  Can you figure out what the rule is for each of these representations?


After a great dinner, I attended the Grade 3-6 session.  Our facilitators were Cathy Chaput and Mike Davis.  They lead us in some great discussion about algebra, and shared with us a great activity involving the book 10 Black Dots.  We had to predict how many black dots we would need should there be a sequel to the book.  This was a great experience as there were about 20 teachers in the room all working in groups of 2 - This lead us to have almost 10 different strategies that were used to help solve the problem.

If you are interested in learning more about patterning and algebra, Dr's Beatty and Bruce have a new book coming out this spring called "From Patterns to Algebra."  It is being published by Nelson Education and includes lessons, ideas on how to link the curriculum between the different grades and division, and also has videos of teachers learning, and whiteboard slides that go along with the lessons in the book.  The cost for the bundle is about $125 and includes the book and the DVD. 

OAME (Ontario Association of Mathematics Educators) local conferences are a great way to get some quick, specific PD after school that is not only cost effective, but close to home and applicable.  Next time you see one, ask your administrator if they will cover the cost for you to attend.  They are about $35 per person (non-OAME member) and usually include a great meal.  You can learn more about OAME and the local chapters at www.oame.on.ca

Great Idea For Teaching Money

Haroula is about to teach her Grade 1 students about how to add coins together.  She has found from past experience that sometimes the students have a hard time understanding that a coin that is smaller than a penny (a dime) is worth more than the penny.  So she created a number line system where the value of the coin (e.g, a dime) will go for exactly 10 spaces.  Therefore as the students line the coins up on the number line, it will tell them what the final total is.  Here are pictures of her great idea:

This is what the number line looks like.

An up close view of the first few numbers.

The picture of the dime goes ten spots on the number line.

The penny goes one spot - A dime + a penny = 11 cents.  It ends at 11 on the number line.

She used real clip art images for the coins and then used the paper cutter to cut out the coins.
This idea might seem a little time consuming, but once you have done it, I think it will help save you a lot of time teaching the concept of adding and subtracting money amounts.  I will put the template up on the FOS Wiki.  Thank you to Haroula for sharing this great idea!